Table of Contents for EditorJS
April 24, 2023

Intro
Editor.js is a great tool for creating rich text content. It's easy to use, and it's open source. However, it doesn't come with a built-in table of contents feature. In this post, we'll learn how to implement a table of contents for EditorJS.
Final Code
Final code for the plugin is available on GitHub
You are welcome to use it in your projects.
Usage
You can install the plugin using npm.
npm install @phigoro/editorjs-toc
To use the plugin, you need to add it to the EditorJS configuration.
const TOC = require('@phigoro/editorjs-toc');
Plugin Structure
EditorJS plugins are simple JavaScript objects that implement a few methods:
constructor()method is called when the plugin is createdrender()method is called to create a UIsave()method extracts the Block's data from that UIvalidate()method checks if the Block's data is validrenderSettings()method is called when user clicks on the Block Actions menu
And we can also add custom methods to the plugin:
_getHeadings()method finds all the headings in the EditorJS data_createTOC()method creates the table of contents UI
Constructor
The constructor() method is called when the plugin is created. It's a good place to initialize the plugin's properties. In our case, we'll need to store the EditorJS API and the data. We'll also create an empty array to store the headings.
constructor({data, api}){
    this.api = api;
    this.data = data;
    this.wrapper = undefined;
    this.data.items = data.items || [];
}
Render
The render() method is called to create a UI. We'll create a wrapper div element and call the _createTOC() method to create the table of contents UI.
render(){
    this.wrapper = document.createElement('div');

    if (this.data.items.length < 1) {
        this._getHeadings();
    }

    this._createTOC();
    return this.wrapper;
}
Getting Headings
The _getHeadings() method finds all the headings in the EditorJS data. It loops through all the blocks and checks if the block is a heading. If it is, it extracts the heading text and level. Then it creates a new object and pushes it to the items array with a random ID and reference to the block.
_getHeadings() {
    this.data.items = [];

    var blocksCount = this.api.blocks.getBlocksCount();

    for (var i = 0; i < blocksCount; i++) {
        var data = this.api.blocks.getBlockByIndex(i);

        if (data.name == 'header') {
            if (data.holder.innerText) {

                var level = data.holder.childNodes[0].childNodes[0].nodeName;
                level = parseInt(level.replace('H', ''));

                // create a new object
                var newObj = {
                    // generate random string 10 characters long
                    id: Math.random().toString(36).substring(2, 12),
                    reference: data.id,
                    text: data.holder.innerText,
                    level: level
                };

                // push the new object to the array
                this.data.items.push(newObj);
            }
        }
    }

    this._createTOC();
}
Creating the Table of Contents
The _createTOC() method creates the table of contents UI. It loops through the items array and creates a paragraph element for each heading. It then creates an anchor element and adds the paragraph element to it. Finally, it adds the anchor element to the wrapper div element.
_createTOC() {

    const headings = this.data.items;

    var divElement = document.createElement('div');

    if (headings.length < 1) {
    var message = '<p>No headings found</p>';
    divElement.innerHTML = message;
    } else {
    for (const heading of headings) {

        // create paragraph element
        var p = document.createElement('p');
        p.classList.add('toc-paragraph');

        // add class to paragraph element
        p.classList.add('toc-l-' + heading.level);

        var text = "";
        switch (heading.level) {
        case 1:
            text = '•';
            break;
        case 2:
            text = '◦';
            break;
        case 3:
            text = '▪︎';
            break
        case 4:
            text = '▫︎';
            break
        case 5:
            text = '▪︎';
            break
        case 6:
            text = '▫︎';
            break
        default:
            text = '•';
        }
        text = text + ' ' + heading.text;

        // add text to paragraph element
        p.innerHTML = text;

        // create anchor element
        var a = document.createElement('a');

        // set href attribute
        a.setAttribute('href', '#' + heading.reference);

        // add paragraph element to anchor element
        a.appendChild(p);

        // add anchor element to toc
        divElement.appendChild(a);
    }
    }

    this.wrapper.innerHTML = '';
    this.wrapper.appendChild(divElement);
}
Save
The save() method extracts the Block's data from that UI. In our case, we'll just return the items array.
save(){
    return {
        items: this.data.items
    }
}
renderSettings
The renderSettings() method is called when user clicks on the Block Actions menu. In our case, we'll just call the _getHeadings() method to update the table of contents.
renderSettings() {
    return [
        {
          icon:   `<svg>...</svg>`,
          name: 'refresh',
          label: this.api.i18n.t('Refresh'),
          toggle: 'toc',
          onActivate: () => {
                // action
                this._getHeadings();
            }
        },
    ];
}
CSS
The CSS is pretty simple. We'll just add some padding and margin to the table of contents.
a:link { text-decoration: none; }
a:hover { text-decoration: underline; }

.toc-paragraph {
    line-height: 0.6;
}

.toc-l-2 {
    padding-left: 1.0em;
}

.toc-l-3 {
    padding-left: 2.0em;
}

.toc-l-4 {
    padding-left: 3.0em;
}

.toc-l-5 {
    padding-left: 4.0em;
}

.toc-l-6 {
    padding-left: 5.0em;
}
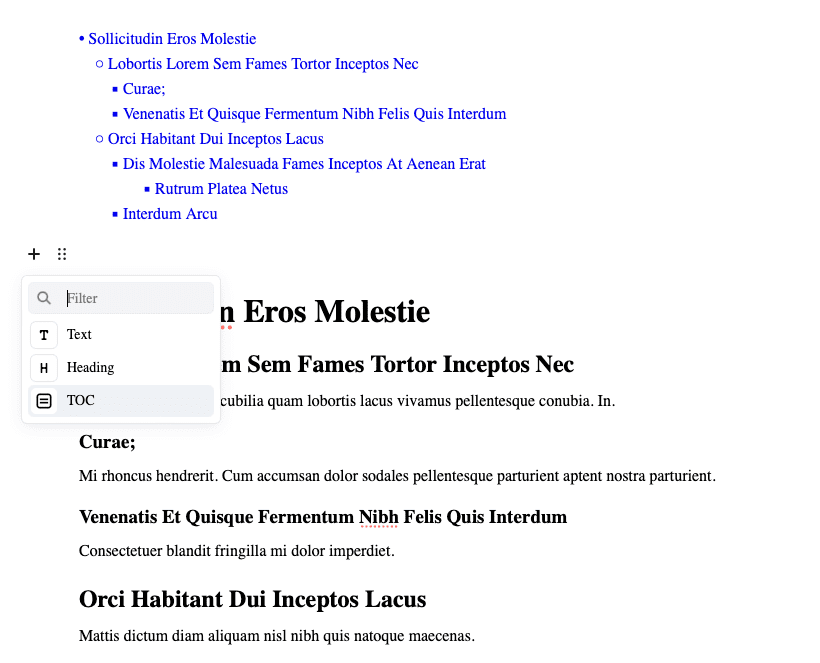
Final Result
Here's what the final result looks like:
Conclusion
That's it! We've created a simple table of contents plugin for EditorJS. You can find the full code on GitHub. EditorJS is a great tool for creating custom editors. I hope this tutorial will help you create your own plugins.
If you find any bugs or have any suggestions, please let me know in the issues section on GitHub.